

 Home
Home 

 Customer Reviews
 Step #1- Create the base of the envelope
The first step involves creating the base of the envelope. For this, insert a rectangular shape in your slide. In order to add a rectangle, follow these steps-
Step #1- Create the base of the envelope
The first step involves creating the base of the envelope. For this, insert a rectangular shape in your slide. In order to add a rectangle, follow these steps-
- Click on the Insert tab and select Shapes
- A drop-down menu consisting of many shape options appears
- Select the Rectangular shape from this menu and add it to your slide

- Change the default color of the rectangle by right clicking the shape
- Then select Format Shape> Solid Fill and select the color of your choice. Here we have selected White color. Also, remove the outline of the shape by selecting Line> No Line
 Note: Change the color of the background so that the rectangular shape is visible. For this click on Format Background and select the color of your choice from the menu (see the screenshot below).
 Step #2- Create the rest of the structure of the envelope
The next step involves creating the lined structure that an envelope has. Though it may seem a very time consuming process at first, it is very easy if you follow this procedure-
Step #2- Create the rest of the structure of the envelope
The next step involves creating the lined structure that an envelope has. Though it may seem a very time consuming process at first, it is very easy if you follow this procedure-
- Go to the Insert tab and click on Shapes> Isosceles triangle

- Add this to your slide and duplicate it by clicking on CNTRL + D command
- You will get two similar triangles (as shown in the screenshot below)

- Rotate the triangles by using the rotation handle such that the pointed edges of both the triangles meet each other as shown in the screenshot below:

- Select both the triangles by clicking on SHIFT. After selecting both the shapes click on Shape Format> Shape Fill and select the color of your choice. Also, remove the outline by select Line> No Line
 Place these shapes over the rectangular shape that we had designed earlier. Your image will look something like this:
 Step #3- Insert a bigger Triangular shape
Next up is to insert another triangle slightly bigger than the previous one. The base of this triangle should be aligned with the bottom edge of the rectangle as shown in the screenshot below:
Step #3- Insert a bigger Triangular shape
Next up is to insert another triangle slightly bigger than the previous one. The base of this triangle should be aligned with the bottom edge of the rectangle as shown in the screenshot below:

- Give an outline to this triangle by selecting LIne> Solid Line and fill it with white color. Once that is done increase the width to as many points as you like. Here we have selected 4 point width
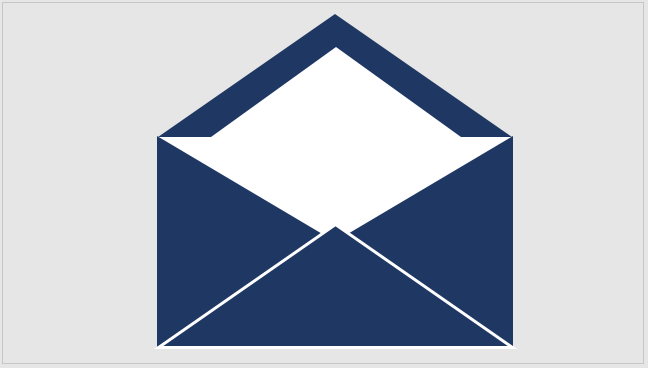
 After giving an outline your envelope will look something like this:
 Step #4- Create the flap of the envelope
Now create the flap of the envelope by inserting another triangle and aligning its case to the top edge of the rectangle ( see the screenshot below)
Step #4- Create the flap of the envelope
Now create the flap of the envelope by inserting another triangle and aligning its case to the top edge of the rectangle ( see the screenshot below)

You can add another triangle and place it over the flap to create an effect like this:
 Step #5- Add and position your text message
- Insert a small rectangular shape that will fit inside the envelope
- Right click on the shape and select Format Shape> Solid Fill. Now select the color of your choice
- Click on the Insert tab and select Text Box
- Type your text in this box just like we have written “Thank You”
- Select the text box and the text message and group them together by clicking on CNTRL + G.
 To create the popping out effect select this shape and click on Send Backward> Send to Back.

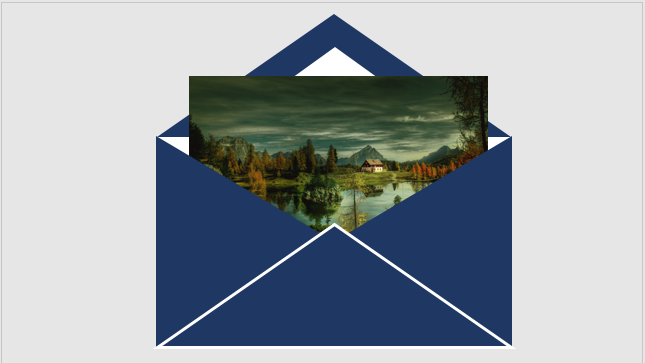
Envelope with an Image

Grab this creative Letter Inside Decorative Envelope PPT PowerPoint Presentation File Slides
Template #2
Click here to download this Stock Photo White Envelope With Postal Stamps PowerPoint Slide
Template #3 Template #5

Grab this informative Stock Photo Red And White Envelopes In Mail Box PowerPoint Slide
Wasn’t this tutorial helpful? I am sure it was. Stay tuned for more such exciting tutorials!

